


If your handwriting is like mine, you may find that printing your deco tables will produce safer, more legible dive profiles.
I've worked out a nice way to print v-planner tables onto labels you can stick onto your wrist slate. Don't let my process below scare you-with a little practice, the whole thing is faster than writing onto duct tape, especially if you wish to reproduce copies for your team.
You'll need a thermal label printer*, and a computer running v-planner. You should be able to make this work on a Mac or Windows.
Follow these easy steps before you hit the dive site:
1. Calculate your profile in v-planner, then choose File->Print. Select "Clipboard."
2. Now clean things up for printing onto a small label. Launch a text-editor and paste your v-planner output into a new file. If you aren't a programmer, the easiest way to find a "text-editor" is to type "notepad.exe" into your Windows launch bar, or to open TextEdit on your Mac (in your Applications directory).
3. Edit things in your text editor to remove extraneous cruft and to clean up your profile for printing. I like to label my dive on the first line (depth, runtime), and to consolidate gas usage metrics onto the second line.
5. If you haven't already, install the driver and print management software for your label printer. You can find these programs on the website for your label manufacturer. Install labels in your printer-I've been using a standard roll of die-cut white paper adhesive labels.
6. Paste your cleaned up profile into the preview screen in your print management software. I've found that a little "nudging" will result in a very clear profile that fills out my labels** nicely. Choose your quantity and click 'print'. In a second or two, each copy of your profile will spit out of the label printer with a very satisfying snip.
You can repeat these steps for each variation on your profile, such as depth and time overruns, or lost deco gas. Be careful to label the dive on the first line of each table so you don't mix up profiles. Secure each set of tables in a paperclip to hand to your buddies when you get to the site.
7. Remove the backing from your labels, and fasten them to your dive slate. Important: Thermal printing doesn't use "ink" but it isn't completely stable either, particularly some time (days) after printing. I've tested the labels for up to 12 hours in a warm fresh-water soak, and the printing did not fade or smudge even with firm contact. The labels can however become a bit soft and can tear. To protect them, stick the labels inside the first "flap" in your wrist slate, or even better, place one strip of wide, clear packing tape over each label. If you fail to do this, it is possible that contact could render part of the label unreadable.
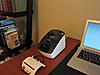
* I'm using a Brother QL 700, available for about $55. This printer, which will print and cut your labels from a continuous roll automatically, is about 9x5x6 inches and weights four pounds, making it portable anywhere you have AC power.
** I'm printing onto Brother DK1202 (2.4in X 3.9in white paper adhesive labels).
Welcome to the Cave Diver's Forum.
 Reply With Quote


Bookmarks